Monday, January 26, 2009

Kemensah Water Fall (Spot 6)

INTRO
This is a place of my MACRO gang give good rating to make me decide to make a trip here where this place locate near Zoo Negara, Kuala Lumpur, Malaysia.

Few rounds been here actually this is a good macro ground, and there is few track available (or visit by me)
i. Kemensah Waterfall chalet
ii. hiking hill track toward water fall (do not go alone as this place seem not really safe from robber, wild animal, ...)

Rate of this Spot -- A
good place where it is near (not far from Zoo), and it consist multiple variety bug for macro ... few rare bugs in other location are common here e.g.

i. giraffe weevil (male)
2.8 Giraffe Weevil (male)... s.i.d.e ...


ii. Orsima ichneumon
4.12 Spider ... Orsima ichneumon

iii. a lot of damselfly
7.7 Damselfly ... FACE ...

7.5 Damselfly - Agriocnemis rubescens... eating a mosquito ...
[am doing stitching (pano) on this damselfly as mpe 65 do not do <1:1 and it can't fit in single frame ]

iv. mayfly
23.1 Mayfly ... s.i.d.e ...


... enjoy


Hutan Rekreasi Ulu Bendol (MACRO Spot 5)

INTRO
I am sorry that I was busy for pass few month with my new setup and stop sharing MACRO spot ... here you go I am continue to explore and share

I had been this reserve forest 17th Jan 2009, which locate near Kuala Pilah, Negeri Sembilan, Melaysia. (as usual who need the GPS location can alway email me and I will try to email you)

I was here while college time where I came here for hiking (was doing hiking while young :D ) and this is the entrance of Gunung Angsi (2702 feet).. lol .. i will do it again next trip and sure I will bring my gear for some landscape too and hope I still can go up there easily :D


Rate of this Spot -- A
OK... let start, this place is a good place where the track is side by side a stream where you can feel the cold air and bug like this place :D.

Bug here big (found inch big robberfly, jumping spider and mayfly) and lighting is not that bad as compare to other forest...

Some Pictures to share
1. mayfly which it have very short life span and this is rare to me as it is inch big

23.1 Mayfly ... s.i.d.e ...

2. robberfly having lunch .. saw minimum 3 same type of robber (silver) which rare for me too
1.13 Robberfly ... l.u.n.c.h ...

1.13 Robberfly ... portrait ...

3. Green tiger beetle (not a good picture but i know this guy is sensitive so I just too rush to get this picture)
2.11 Tiger Beettle (Green) ...g.r.e.e.n ...

4. was in the feet deep stream to shoot some rare damselfly (ohh i missed the mating picture)
7.2 Damselfly ... ^-^ ...

7.2 Damselfly ... r.e.s.t ...

5. beautiful fly
1.14 Fly ... beautiful fly ...

Thursday, January 22, 2009

MACRO PP 1: How I Increase my MACRO picture DOF (Stack Focus)

I am sharing this as this is how I do to get my macro picture get better DOF... hope you all will enjoy this....

To have picture stack, we should
1. get major part of interest of the object focus pictures, how I get this
i. accurate focus skill, practice more until you can focus any part of the object. e.g. just focus the bug eye, nose, ears .....
ii. faster flash speed
- sometime I will recommend to use manual flash to get faster recycle time e.g. 1/8-1/4 so I can shoot multiple picture continuously without too worry my flash
iii. shoot with standard angle, e.g. side view, face direct ...so even the bug move, we still can chase the bug to shoot the same angle to stack (some time I even shoot different bug but same angle to stack). But for sure, we need similar magnification to have success stack

2. PP software to do this
i. CS3 masking method (which I will discuss here)
ii. combineZM, which I feel it is quick easy to use but I have yet start to use it

3. PP Process
i. open multiple picture and make sure it have similar exposure and white balance e.g.


ii. use the one with best composition as base and duplicate other pictures on the main picture

iii. duplicate other picture on to the main picture as select from ii


iv. choose the opacity on right hand side to ~75%


v. move the transparent picture to match the main picture, if the angle not correct. You may use transform > rotate to match it back

vi. after match it, please hide the picture as below


vii. use the brush tool to erase the part you wish to have from the picture as show below


viii. continue with other pictures and repeat iii-vii

happy trying :D ... feel free to ping me if you feel my instructions are not clear enough and I will try my best to update more details more :D

or you can email me liewwk76@gmail.com

liewwk

Thursday, January 8, 2009

How I shoot MACRO? (updated on 8th Jan 2009)

I am trying to share how I shoot macro and this may not be the best setting or skill but just hope it can help whoever want to start MACRO photography to have a some idea what/how to start .....

1. Manual Focus
- due to the swallow DOF so it is not easy to get the AF work correctly what you going to focus especially at >1 life times
- so I will fix my magnification, then move myself backward & frontward to get object focus instead of turning the focus ring (do not do this) ... (i used to do this and this make you even tough to get object focus)

2. aperture number use
- refer to how is Aperture affect MACRO Here
- so minimum F number I use will be
- I provide the recommended aperture range and F number I use :D
<1:1 F4 - F11 ---> F8
1:1 F8 - F16 ---> F11
2:1 F8 - F13 ---> F10
3:1 F8 - F13 ---> F9
4:1 F5.6 - F11 ---> F8
5:1 F5.6 - F8 ---> F7.1
- you may ask
i. why I reduce the aperture/F number and this eventually reduce my DOF
- yes, it will reduce DOF but i have to maintain the sharpness which impact by Diffraction (higher F number use will make picture softer)
ii. why my pictures DOF look great and ~same with 1-4 :1 even smaller aperture/F number use ....
- I focus stack my pictures so DOF in my picture is result of multiple shooting with stacking. what is focus stack ? please refer here


3. shutter speed
- for start I will prefer to have minimum 1/125 or above
- what I use --> 1/200 :D

4. ISO
- for start, this is the only place you can get correct exposure if F8 & 1/125 still get under exposure picture
recommended ISO 100-400 only
- what I use --> ISO100

5. Flash, Yes or No???
- this is very subjective question where it depend bug that you shoot, IQ you need, environment that you shoot ......
- normally while shoot Natural Light (NL) without flash, I will use Aperture priority mode.... F8 then will adjust ISO to get correct aperture
- what I use --> flash (ettl)
- while use flash, the flash have to be diffuse.

6. Diffuse
- this is most important portion (for me)
- if you din't get diffuse correct, object details will be loss even you got it focus
- what I use ---> styrofoam paper sheet

As last, I would like thanks all people that refer this post and hope I can help you to make fun to start MACRO ........

Welcome to MACRO Photography and what do use ?

INTRO
One of the greatest powers of photography is its ability to show us the world around us in ways we aren't normally able to see it. Wide angle lenses create a sense of place by taking in more at a time than we normally see. Telephoto lenses also have a power by reaching out and extracting a small slice of a distant subject. Perhaps no other area of nature photography shows us things that normally go unnoticed though than does the world of macro.

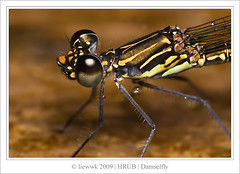
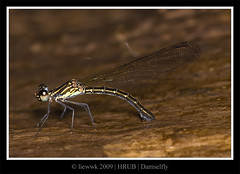
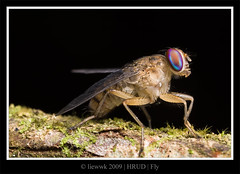
Macro photography gives us the chance to take a look at things more closely than we can or often do normally. It opens up a whole new world of subject matter that may be literally right in front of us but not normally grasped or appreciated by our senses. Tiny flowers and insects, the texture and pattern of mineral crystals and sea shells and so on can provide endless opportunities to create compelling images no matter where you may be. There are plenty of close-up and macro subjects no matter where you are. Due to the size of the subjects in this realm, there exists any number of them right in your own back yard. Sit down on the grass sometime and get comfortable. There's no telling what you may find.

Trying to put more information's on this post where could consolidate from multiple site to ease the beginner

WHAT to Use
1. Life Size
One of the most fundamental concepts to understand in the realm of macro photography is that of "life size." Macro photography deals with taking pictures of small subjects, so it's only natural that we should start our discussion with a look at magnification.
It refer to 1:1 and what is 1:1

2. MACRO len
Using a special-purpose lens called a macro lens (perhaps confusingly, some manufacturers call it a micro), having a long barrel for close focusing. A macro lens might be optimized to provide its best performance at a magnification of 1:1. Some macro lenses, like the Canon MP-E 65 mm f/2.8, can achieve even better magnification— up to 5:1

3. Extension Tube
Placing an extension tube between the camera body and the lens. The tube has no glass in it; its sole purpose is to move the lens farther from the film or digital sensor. The farther the lens is from the film or sensor, the closer the focusing distance (and the greater the magnification) and the darker the image. Tubes of various lengths can be stacked together, allowing for increasing levels of magnification while simultaneously decreasing working distance. With tubes attached, the camera will lose the ability to focus to infinity.

4. Tele-Convertor (TC)
Attaching a telephoto extender between the camera body and the lens. A 1.4× or 2× teleconverter gives a larger image, adding macro capabilities. As with an extension tube, less light will reach the film or sensor, and a longer exposure time will be needed. However, working distance remains the same as without the teleconverter.

5. Close-up Diopter
Placing an auxiliary close-up lens in front of the camera's taking lens. Inexpensive screw-in or slip-on attachments provide close focusing at very low cost. The quality is variable, with some two-element versions being excellent while many inexpensive single element lenses exhibit chromatic aberration and reduced sharpness of the resulting image. This method works with cameras that have fixed lenses, and is commonly used with bridge cameras. These lenses add diopters to the optical power of the lens, decreasing the minimum focusing distance, and allowing the camera to get closer to the subject.

6. Reverse len
Reversing a lens of lesser focal length in front of a normally mounted lens using a very inexpensive "macro coupler," which uses two male filter threads to join lenses. This method allows most cameras to maintain the full function of electronic communication with the normally mounted lens for features such as open-aperture metering. Magnification ratio is calculated by dividing the focal length of the normally mounted lens by the focal length of the reversed lens (i.e., when a 18 mm lens is reverse mounted on a 300 mm lens a 16:1 magnification ratio is achieved). The use of automatic focus is not recommended due to the extra weight of the reverse-mounted lens. Attempted use of automatic focus with this technique could result in damage to the camera or lens. Working distance is significantly reduced as compared to the original lens.

7. Bellow
Using a bellows attachment between the camera body and the lens to extend the lens to film plane distance. Similar to an extension tube, but adjustable.

Sunday, January 4, 2009

what I did recently....

I am doing a lot of portrait (sorry picture no time to share here for more check out my flickr ) learning birding with my newly add 100-400mm tele .... i found this is really tough especially in the jungle with low light condition......

so far I went
1. Genting (so excited to see 1st Hornbill)
- but no good picture as the environment really in low light :( and bird are far from me

my 1st birding picture ... lol why blocking ... was too excited
1001.1 Hornbill ... my 1st birding picture lol

2. Bukit Cahaya
see owl in the evening :D

1004.2 Owl - Barred Eagle Owl ... natural one

3. Kaula Selangor
more picture after 2 experience .... :( but still <10pictures after 4hours

i. woodpecker ... wow it is so beautiful
1006.1 Woodpeckers ...Common Flameback Woodpeckers


ii. sunda Pygmy Woodpecker
1006.2 Woodpeckers ...sunda Pygmy Woodpecker

iii. Tiger Shrike
1008.1 Tiger Shrike

iv. Brown Shrike
1007.1 Brown Shrike

v. little heron ... this is nice
1009.1 Little Heron


hope I could do more but this is really time consume .... need a lot of time and patient to make a outing ... :(
Related Posts Plugin for WordPress, Blogger...