Friday, August 7, 2009

MACRO PP - How I Sharpen my Picture or Should I ?

This question have been ask by myself since I start photography, I know it going to improve the overall sharpness and it look better but if we fail to find the balance point, we could over do it or we call over sharpen.... so should I ?

I seldom do sharpen for my pictures before Jul 2009, even few occasions I did that just for some testing purpose or accident add the Unsharp Mask (USM) Sharpen by Ninja Noise (ohhh ... it is part of the task....) so normally I remove all USM while doing my ninja noise.

Then after I start my landscape photography, I found sharpen my picture is almost a must as it look really blur (it could be I shoot RAW but no RAW sharpen done). So I start apply sharpen as below method

1. USM
- while i start my sharpen, I start with USM
- but I worry to overdone it so I normally create additional layer for the USM and change the opacity if I feel it is over done

i. edit whatever you need to do before sharpen


ii. duplicate additional layer


iii. go for USM


iv. normally I will apply 120, 0.5, 0 for my 5dm2 picture size
- this is very much depend what or how many you going to sharpen but no worry on over sharpen here as later stage we still can change it or softern it


v. change the opacity of the USM sharpen layer, normally I use 20-50%

vi. sample sharpen and non sharpen

sharpen


100% crop


without sharpen


100% crop


vii. after resize, picture normally look softer so


so I will increase the USM sharpen layer to higher opacity to get more sharp picture


2. Smart Sharpen
- I learn this from "Juza photography", Juza is one of my favor natural photographer who really share how he shoot, pp ...
- I continue use the layer opacity method to avoid over sharpen too

i. duplicate a layer for "Smart Sharpen" purpose


ii. go to filter - smart sharpen


iii. depend how much you going to sharpen or your image size and again this could be change by the layer opacity


120, 0.2, Len Blur

iii. sharpen image and change opacity of the image so it is not over sharpen


normally I apply 30-50% for full size of 5dm2 full size picture


iv. sharpen and without sharpen picture on 100% crop
sharpen


without sharpen


v. after resize, increase the opacity from 20-50% to 70-100% as the resize will soften the image


sorry for not really provide a good example here, the sharpen and without sharpen picture with very minimal different ... as rushing on this for a friend of my Derrick :D

but it is straight forward to have a try ... enjoy .....
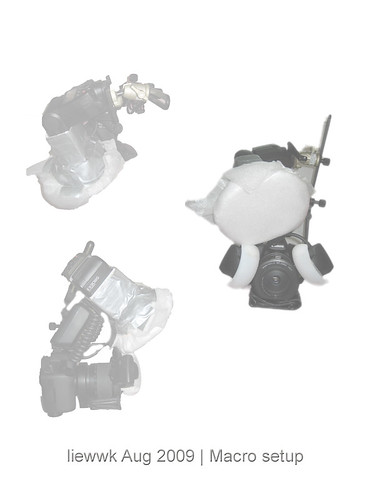


Wednesday, August 5, 2009

How I shoot MACRO - liewwk update macro setup - Aug 2009

2009 Aug macro setup

my update MACRO setup

- Canon 5dm2
- Canon MPE65
- SIGMA150 F2.8
- Kenko 1.4x tc
- SIGMA 2x tc
- Canon MT24 macro twin flash
- Canon Speedlite 580EX II
- Off-Camera Shoe Cord OC-E3
- Kirk Macro flash bracket
- Manfrotto 560B FLUID VIDEO MONOPOD W/HEAD
- velbon Neo 630 tripod

View On Black & Large

Friday, June 26, 2009

a spider shot that worth to share here ...

found this spider and think it worth to be share here ...

How do I make this shot ...

1. cut the stem using cutter
2. move it slowly to better BG
3. block the wind by 2 umbrella
4. setup tripod and shoot :D

Tree trunk spider
4.20 Tree trunk spider ... re-PP...

4-5 days later I found this again at another reserve jungle (Hutan Lipur Sg Congkak @Ulu Langat) and it is not moving as previous so decide to have another HDR macro :D

4.20 Tree trunk spider ... HDR ...

Wednesday, June 3, 2009

MACRO PP : Focus Stack using Different Pictures

I am doing this ad-hoc (have plenty of topic are in the list). This is similar to another topic discuss in

http://liewwk-macro.blogspot.com/2009/01/how-i-increase-my-macro-picture-dof.html

in two situations as below

1. what if the bug move then how to apply the method apply above
2. a good composition pictures but not get main object focus... how ? delete it ?

so this topic help me to "rescue" above 2 problems

it is simple as step by step below
1. as this shoot when windy day + handheld + keep moving fly so the composition look ok but main object not focus as below


100% Zoom


2. I have a similar fly (similar angle is most important) shoot 1-2 weeks ago which got better eye focus but magnification are different


3. open the main composition picture as base


4. open the other "eye" picture and duplicate over the previous layer


then this layer will over write the main layer


5. set the opacity to 20-30%


then you will get this


look for "transform control" it different for CS3 & CS4 (this screen shot form CS4 and CS3 can get from "Edit" menu")


6. change the size of the picture if magnification different


-rotate it if the angle is not correct


7. adjust back opacity to 100%


8. add layer mask and make it invert


while invert of the layer mask, you will see


9. select a brush with "white" color by selection


10. zoom in to the eye


11. use smaller brush


12. brush out the area you interest , for this is head + eye


zoom out then you will see this


13. save the picture, let see the exif


14. easily verify by zoom 100%


so see the different ?

stack


original


some of you will say WOW, some will say "You Cheating" ....but this is rule of digital so we this is good to know :D

so have fun :D ...

Monday, June 1, 2009

MACRO PP : How I Increase my MACRO picture DOF (Stack Focus CZM)

This is continue another method of mine how to increase DOF but instead manually using CS3 layer mask method but this is using CombineZM(a freeware). it is much easier to use but it may need to combine this software & the previous method discuss @

http://liewwk-macro.blogspot.com/2009/01/how-i-increase-my-macro-picture-dof.html

as usual below is step by step for how I use CZM for additional info or discuss ca refer @ Macro Viewer-flickr


1. open CZM


2. create a new stack


3. choose those files you wish to stack


4. simply "do stack by" click as below


5. waiting it finish running batch processes and output should be massive with shadow due to not same angle or possition shots


6. do below to reduce the shadow, go to the frame and select the main frame you wish to be main BG


7. choose 2 points that significant appear at all pictures and select by choose key "1" then click "exit"


follow another point as "2" and Exit also on another point


8. repeat this by choose other frames


choose the same point where "1" & "2" but this turn use "3" & "4" and choose


but this time use "Set and Use Params" & click "ok" as window below


9. repeat all step "8" for all other frame

10. and do stack again


11. this time more cleaner picture will be out

12. I will use Photoshop "clone" to clone away the shadow and also some additional manual stack if need which can refer from

http://liewwk-macro.blogspot.com/2009/01/how-i-increase-my-macro-picture-dof.html


unstack version
2.13 Long-nosed Lycid Beetle ... non stack

stack version
2.13 Long-nosed Lycid Beetle ... stack
so enjoy ....
Related Posts Plugin for WordPress, Blogger...